Why mould shows up on walls in the first place
Mould is less a “dirty house” problem and more a moisture-and-airflow problem. It thrives where damp lingers and fresh air struggles to circulate, so it often appears behind wardrobes pushed tight to an outside wall, around chilly window reveals, in bathrooms after steamy showers, or in corners where warm indoor air meets a cold surface.
If you have ever wiped a small patch away only to spot it creeping back a week later, that is usually a sign the underlying conditions are still in place. Mould spores are common in the air, so the goal is not to create a sterile home. The goal is to stop spores from finding a welcoming, damp landing spot on your walls.
Before you clean: a quick safety and surface check
Know when a DIY approach is not enough
If the affected area is very large, keeps returning aggressively, or you suspect moisture is coming from a leak, rising damp, or damaged exterior pointing, it is worth investigating the source before you focus on repeated cleaning. Persistent moisture can also damage plaster and paint films, turning a cosmetic problem into a repairs problem.
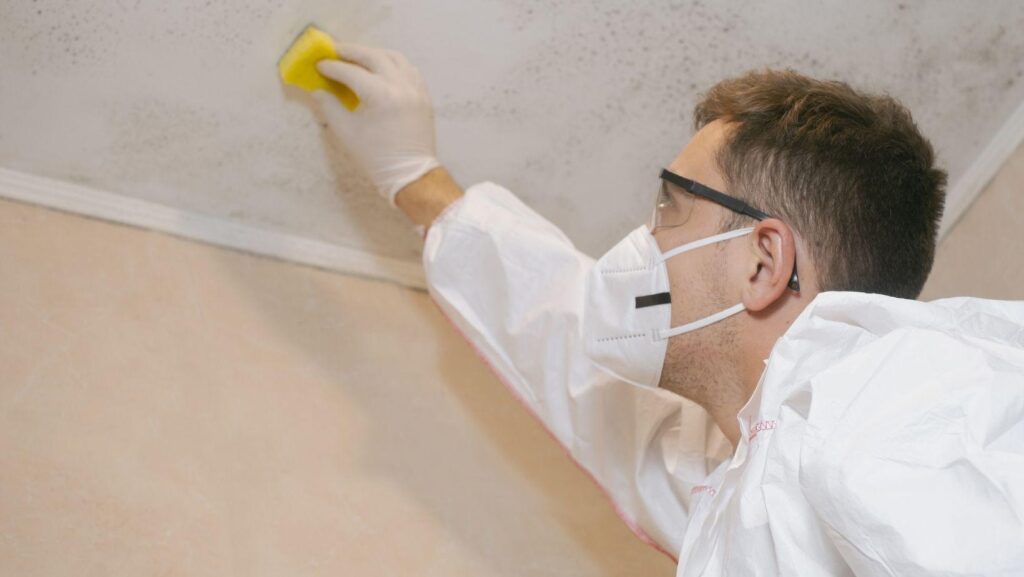
Protect yourself and prevent spreading spores
For small, contained patches, open a window, keep the door closed if you can, and avoid dry-scrubbing. Dry brushing can lift spores into the air and spread them to other surfaces. Wear gloves, and if you are sensitive to dust or odours, consider a mask as well. It is also smart to move soft furnishings away from the area, because fabrics can trap spores and that musty smell tends to cling.
How to remove mould from walls without making it worse
Step 1: Treat the mould, do not just wipe it
A common mistake is to wipe first and treat later. Wiping can smear the growth and push moisture and staining into paint or porous plaster. Start by applying a mould-removal solution suitable for your wall type, and allow the recommended dwell time so it can work on the growth rather than simply lifting surface discoloration.
If you want a detailed walkthrough of the process and common pitfalls, this guide on how to get rid of mold on walls lays out a clear, step-by-step approach that is easy to follow in real homes.
Step 2: Wipe carefully and rinse as needed
Once the solution has had time to work, wipe with a damp cloth or sponge using gentle pressure. Replace cloths as you go, because reusing a heavily soiled cloth can redistribute mould residue. If the product instructions recommend rinsing, do it, then dry the surface thoroughly. Drying matters more than people expect, because leaving the wall slightly damp invites the next round.
Step 3: Deal with staining and damaged finishes
Sometimes the mould is gone but a shadowy stain remains, especially on matte paint or older plaster. That does not always mean active mould is still present, but it can. If the area keeps darkening after cleaning, you may be dealing with moisture still entering the wall, or a finish that has been compromised. In those cases, a stain-blocking primer and repaint can help, but only after you have corrected the moisture issue. Painting over active mould is like putting a lid on a simmering pan, it will push back through.
Room-by-room trouble spots and what actually helps
Bathrooms: steam, cold tiles, and silicone seams
Bathrooms are mould’s favourite because warm steam condenses quickly on cool surfaces. Run extraction during showers and for a while afterward, and squeegee glass and tiles if you can. Pay attention to silicone and grout lines, where mould can anchor and then spread outward. If you have a window, a short burst of wide-open ventilation after bathing often works better than leaving it slightly ajar all day.
Bedrooms: wardrobes against outside walls
That “mysterious” mould behind a wardrobe is usually a combination of limited airflow and a colder exterior wall. Pull large furniture a few centimetres forward to let air circulate, and avoid packing wardrobes so tightly that fabric presses against the wall. If the room feels chilly and clammy in the morning, gentle, consistent heating and ventilation typically beats intense “blast heating” once a day.
Kitchens and utility areas: hidden humidity
Cooking, kettles, and drying laundry indoors all add moisture. Use lids on pans, run extraction when you cook, and avoid air-drying clothes in rooms with poor ventilation. If you must dry indoors, put the rack in the most ventilated space and keep airflow moving. The aim is to stop moisture from settling on colder wall surfaces where mould can take hold.
Prevention that feels doable, not fussy
Keep humidity in a sensible range
If your windows regularly stream with condensation, your indoor humidity is probably high enough to support mould. A simple humidity meter can be eye-opening, especially in winter. Many homes do best when humidity stays roughly in the middle range, not too dry, not too damp. If your readings are consistently high, focus on ventilation first, then consider dehumidification as a practical backup.
Improve airflow where mould likes to hide
Mould often grows in the quiet, still-air corners of a home. Leave internal doors open during the day if it helps air move, keep trickle vents clear, and avoid blocking radiators with heavy furniture. For long-term improvements, make sure extractor fans are correctly sized and actually vent outdoors, not into a loft space.
Spot early warning signs before they bloom
The first clues are not always black spots. A faint musty smell, peeling paint at the edges, or recurring condensation in the same corner are all early signals. If you catch mould early, removal is easier, the wall finish is more likely to recover, and you avoid that frustrating cycle where the patch returns just when you think you have solved it.
When mould keeps coming back: what to investigate next
If you have cleaned carefully and improved ventilation but the same area reappears, step back and look for a moisture source. Check for leaking gutters, cracked render, bridged damp courses, plumbing leaks, and gaps around windows that let rain in. Also consider thermal bridging, where a colder section of wall consistently attracts condensation. In many homes, the “fix” is not more scrubbing, it is stopping the wall from staying damp in the first place.
Once the underlying cause is resolved, routine upkeep becomes straightforward: quick ventilation after moisture-heavy activities, occasional checks in known problem corners, and prompt treatment if you spot new growth. That is when mould stops being a recurring battle and becomes an occasional maintenance task you can handle with confidence.