Original pine floorboards in many UK homes, wooden floorboards are more than a flooring choice, they rightly are a part of the history of your home. Restoring these real boards not only makes it structurally more attractive, it also adds breath to your ambiance as well as a unique identity to your home. As a homeowner, a landlord, or in charge of a community building, after a successful restoration, the beauty and performance will be lasting.
This guide is going to take you through all the stages of restoring old floorboards, starting with the inspection and finishing with the final coats, and it will show you why it is always better to work with skilled workers like those of Floorworks(tm).
Why Restore Original Floorboards?
Restoration offers more than aesthetic improvement. Here’s why investing in floorboard repair and refinishing is a smart move:
- Preserves Authenticity: Original pine floorboards tell a story. Sanding and sealing them highlights their natural grain and historic charm.
- Adds Value: Refurbished wooden floors can create immense value to your property in the marketing front and in value creation.
- Eco-Friendly: Restoration does not demand replacing boards, disposing of waste, and making new materials, but reusing what is present.
- Strengthens Longevity: floors can be refinished several times, and the right products and techniques can ensure longevity of decades.
- Tailored Results: Select special finishes, stains, and sealants to produce the preferred look.
Step-by-Step Guide to Floorboards Restoration
1. Expert Evaluation
The restoration process begins with a professional floor assessment to determine:
- Board Thickness: The thickness is measured to guarantee that they are capable of keeping up with some sanding without decreasing structure.
- Structural Damage: Cracks, bowed and decayed boards are detected and repaired with recycled timber.
- Floor Levelness: Floor may have uneven surfaces, which are taken care of in order to have stable and even finish.
- Signs of Woodworm: If detected, specialist treatment is applied before any sanding or repairs begin.
2. Floorboard Repairs and Replacements
Any broken boards are glued or lurre-nailed before sanding, or as near-matching fitted reclaimed pine is used in place. This will make the grain and colour uniform. In case there happens to be an old fireplace hearth, it is taken out very carefully, and the hole is plastered up, so the patch can hardly be detected among the rest of the boards.
There are instances when the nails are reset or extracted to avoid breaking the sanding machines, and the squeaky and loose boards are also nailed down to ensure that they do not move again.
3. Gap Filling for Smooth Finish
To create a draft-free, even appearance, gaps between floorboards are filled using two main methods:
- Resin & Dust Mix: Ideal for narrow gaps. Fine dust from sanding is mixed with resin to create a natural-looking filler.
- Timber Slivers: Reclaimed wood slivers are inserted into wider gaps, offering a traditional, more durable solution.
Gap filling not only enhances aesthetics but also helps with insulation and soundproofing.
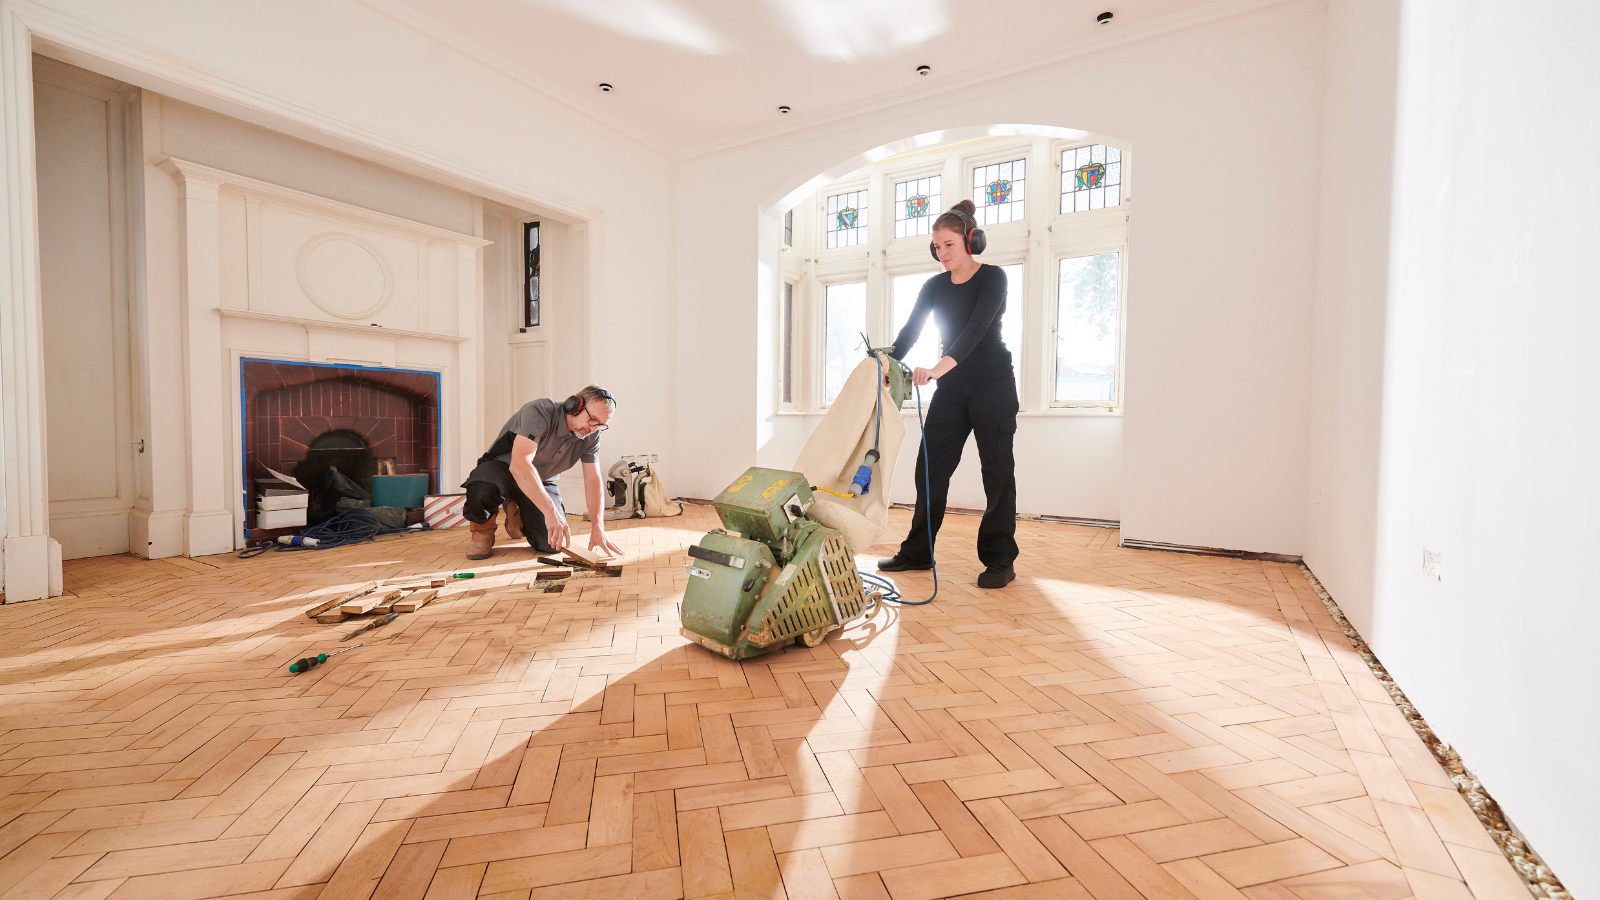
4. Sanding the Floor
Areas of old finishes, old paint, or various layers of grime are sanded off with dust-free sanding equipment to reveal the natural beauty beneath. The machines used at Floorworks(tm) are powerful and gentle, generating minimal mess and preserving the integrity of the wood.
Normally, three passes are used to sand:
- Rough Grit Pass: Removes old finishes and levels uneven boards.
- Medium Grit: Smoothens the surface.
- Fine Grit Finish: Prepares the floor for staining or sealing.
5. Staining & Colour Enhancement (Optional)
Once the surface is smooth, staining can be applied to enhance or change the colour of your floorboards. This can enable you to complement contemporary interiors or highlight the wood colours.
Trendy colors include dark walnut and smoked oak, to light grey and whites to induce a Scandinavian style.
6. Finishing & Sealing
This is the last and the most significant step in order to preserve your newly restored floors.
Choose from:
- Lacquers (e.g., Bona, Junckers, Loba): In these, the surface is very durable, the layer very thick, they are long-term and easy to maintain.
- Hardwax Oils (e.g., Osmo, Fiddes, Woca): They are easier to repair on spot, they facilitate a natural and a breathable finish that showcases wood grain.
Floorworks™ applies multiple coats — usually a primer plus two lacquer coats — to ensure maximum durability.
7. Add the Finishing Touches
To complete the project, your restoration may also involve:
- Skirting Boards, Thresholds & Beading: Fitted or refitted to put frames around your floors in beautiful ways.
- Door Trimming: Making Adjustments of Doors dragging on the new floor level.
- Furniture & Room Reassembly: Included in the optional staged reassembly when it is not possible to clear a full room.
With the help of Floorworks™, you can achieve a complete interior transformation through floorboards repair & restoration that feels both elegant and timeless.
Who Is Floorboards Restoration For?
Residential Homes & Rentals
Whether it is your place you are working on or a rented out property, refurbished floorboards will awe your guests as well as tenants. Floorworks effects a partnership with homeowners and landlords, in offering accurate as well as fashionable services.
Schools, Churches, and Community Halls
Public and commercial spaces often suffer high foot traffic. Floorworks™ has vast experience restoring floors in these environments with minimal disruption, using commercial-grade lacquers for long-lasting performance.
Planning Your Restoration Project
To ensure smooth operations:
- Clear the area of furniture where possible. If not, discuss phased work options.
- Book early during peak seasons like summer.
- Request a site survey for tailored advice and a transparent, itemised quote.
Floorworks™ offers quick price calculators, on-site consultations, and fully insured services with a 3-month workmanship guarantee.
Conclusion
Let Your Floors Tell Their Story
Original floorboards are an asset not to be overlooked. Their wear, their flaws, and their grain have their own story to tell; it is the kind of tale you do not want to rewrite, but your job is to recreate.
Working with experienced professionals such as Floorworks(tm) ensures that not only do you safeguard your investment, but you also create the interior styling of your home to a whole new level. The procedure can be lengthy, but the outcomes are impressive: the recovered personality, increased preservation, and enduring beauty to be treasured.
This is the ideal time to restore your original floors and feel the change yourself.
FAQs:
- How long does floorboard restoration take?
Restoration time for an average 40 sqm area usually takes 2-4 days, depending on the amount of damage, drying time, and finishes applied. - Is floor sanding noisy?
Yes, especially in the first phase of sanding. The machines emit about 8590 dBs. With current dust-free systems, however, there is minimal dust. - How often should floorboards be restored?
The floors in the residential area normally require repair after 7-15 years depending on the traffic. It can be required once every 3-7 years in high-traffic spaces. - Do you offer staining options for custom looks?
Yes. Floorworks™ offers a range of staining services to match your interior style, from natural wood tones to contemporary colours. - What is included in your service?
Our restoration package provides assessment, repairs, sanding, filling the gaps, staining, sealing, and fitting of the skirting/accessories.